FREE customized Homeschool I.D. Cards!
 |
|
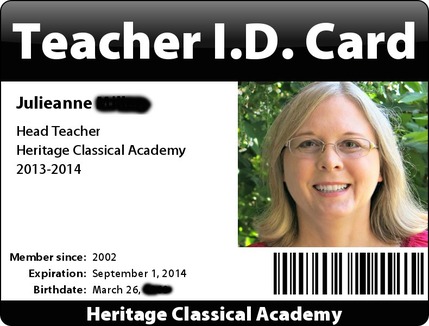
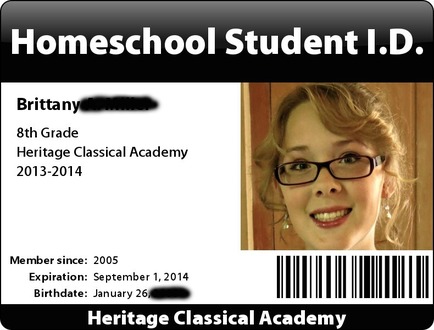
Though I've blocked out some personal information, this is a general idea of what our family's homeschool I.D. cards look like. Over the years, I've found that it has helped to carry a Homeschool I.D. Card with me in my purse or wallet. In order to receive educational discounts at fabric and craft stores, gain less expensive entry for field trips at an education discount, and other things, it has been beneficial to be able to "prove" that our family is a home educating family.
In our particular state, no "proof" of home education is given by the state government or individual school districts. I could carry around a copy of the letter I have on file from our county education office, showing that they have received our notice of intent to home educate our children, but I don't want it to get lost if my purse was stolen, etc.
There is literally nothing else I have to "prove" that we are teaching our children at home...except that they are home with me on most days. Making our own Homeschool I.D. cards allows us to obtain the best educational discounts offered by stores, museums, and field trip locations!

Here are two options for making your own homeschool I.D. card. The first option is my favorite.
 |
|
If you click on the graphic above, it will take you to Big Huge Labs' free I.D. badge making site. This is my favorite website to use to make our I.D. cards. My I.D. card at the top of this page was made using Big Huge Labs' website. Here's the direct link:
http://bighugelabs.com/badge.php
Big Huge Labs provides a bit more flexibility with what you would like your I.D. card to say and how it will look; you can choose colors and text in a lot more places. The Homeschool I.D. card at the top of this posting is a sample of what I've made, using Big Huge Labs' free website.
Big Huge Labs won't laminate your card for you and send it to you in the mail, like Homeschool Buyers Co-op, but that's okay! I've found a more frugal method of laminating our I.D. cards than what Homeschool Buyers Co-op will provide. I was able to easily laminate all three of our I.D. cards for the same price as what Homeschool Buyers Co-op charges for one Homeschool I.D. card. In fact, I found that I could laminate five Homeschool I.D. cards for not much more than what the Homeschool Buyers Co-op charges for one laminated card.
See the bottom of this post to find out how to inexpensively laminate your cards!
See the bottom of this post to find out how to inexpensively laminate your cards!
One of the most common problems people have when making their own I.D. cards like this is that they find that the photo they want to upload from their own computer or camera is too large in size. This wasn't so much of a problem in years past, when cameras had a much smaller megapixel capacity. I found that when I have made our I.D. cards, I must use another website to "shrink" or reduce the size of megapixels in the photos before uploading them to make our own I.D. cards.
One of the easiest and free ways to do this is to use www.Picmonkey.com.
How to resize your photo (skip this section if the photo has already been reduced in size):
1. On the left side of the screen, you'll see "Edit a Photo." Click on that.
2. After selecting "Edit a Photo", it will automatically direct you to your computer. You'll need to find the photo that you wish to shrink in size, and double-click on it to select it. Depending on the size of the photo, it may take a minute to load up the photo, so be patient. :)
3. If you want, you can select "Auto Adjust" on the top left hand side of the screen, but that's up to you. Select "Crop", "Rotate", "Exposure", "Colors", and "Sharpen" as desired. (Use "Crop" to remove background so that you'll just have a head shot of the person. You can always go back and delete a change you made to your photo if you liked the previous image better. Just click on the LEFT arrow at the top center of the screen ("Undo the last action.")
4. The last step you'll want to do here is to resize your photo using the Resize selection on the left side of the screen. Make sure that the "Keep Proportions" box is checked. On the left box, change the number to around 150. If you have placed a check in the "Keep Proportions" box, the number in the right box will adjust so that your photo won't appear wonky and sized incorrectly.
5.Click "Save" at the top of the PicMonkey screen. Name the file (something like "Julieanne's ID Avatar"). For the quality, select "Mel" or the lowest quality. Then click "Save Photo." Your new, resized photo will be on your computer, ready to upload it to the Big Huge Labs website. This may seem complicated to do all these steps, but it should go rather quickly after your first photo. You'll get the hang of it!
If you have any questions, feel free to contact me here.
After you have saved your resized photo back to your computer, you're ready to make your photo I.D. card!
Using Big Huge Labs to make your new Homeschool I.D. Card:
1. Go to http://bighugelabs.com/badge.php
2. Underneath their logo, you'll see "Choose photo". You can upload from your computer, or select a photo from Flickr or Facebook. If your resized photo is saved on your computer, choose "Upload." It will display "Choose a file to upload". Click on the "Browse" feature and double click your resized photo from your computer (or Flickr or Facebook, depending on where you have saved your resized photo).
3. Next, you'll see, "Keep this part of my photo visible if it must be cropped: Center...Top/Left...Bottom/Right. I recommend selecting "Top/Left", because that's what worked for all of my photos, but you may need to experiment with this.
4. For "Style", select "Photo Badge (landscape)".
5. For "Badge Color", you can stick with their default color (blue), or you can select your own color. Just click on the blue color square and select the color you would prefer. Or, use an HTML color code to select your favorite color. (http://www.computerhope.com/htmcolor.htm#03)
6. For "Header Text", delete the word "PRESS" in the box, and enter "HOMESCHOOL I.D. CARD".
7. For "Footer Text", delete the word "OFFICIAL", and enter the name of your homeschool. For more authenticity, I recommend selecting a name that doesn't include your family's last name in it. Our homeschool is called, "Heritage Classical Academy".
8. Place a check in the box that says, "Include an official looking barcode?" You'll want this! It won't actually scan or do anything, but it does make your card look more official.
9. In the "Name" box, I recommend typing your child's first name, middle initial, and last name. This will also make the I.D. card seem more official.
10. In the "Text" box, erase anything already written there. You can type whatever you would like, but here's what I did with mine. I made sure to double-space between each line so that it would fill the blank white space on the card:
Head Teacher (or Principal)
(skip a line/hit Enter twice on your keyboard)
The name of your school
(skip a line/hit Enter twice on your keyboard)
School year
For your children, you may want to include:
7th Grade (or the grade of your child)
(skip a line/hit Enter twice on your keyboard)
The name of your school
(skip a line/hit Enter twice on your keyboard)
School year
11. For the "Member Since" box, type in the year you began homeschooling - or the year your children were born.
12. For the "Expires" box, type in a date that is right before your new homeschool year begins, one year from now. For us, I type in September 1, 2013, because we'll be starting a new school year, and I want this current I.D. card to last for this entire school year.
13. For the "Birthdate" box, it's up to you if you would like to enter this. I choose to do so, because I rarely need to show the card to anyone, so it doesn't bother me to have this on my card. After all, it's on my driver license, too, so that information is already in my wallet.
14. Next, click on the blue CREATE button!
15. Your new I.D. card will show up nice and large on your computer screen. If you would like to go back and change something on the card, click "Edit" at the top of the screen. Then, click on the CREATE button to view your newly edited I.D. card.
16. If you like what you see, and you're ready to save it to your computer, click "Save".
17. On a PC, select "Save File." Once it downloads, right click on the file, and select "Open Containing Folder." Now you can drag the ID card file to your Desktop or wherever you would like to save it on your computer. You will want to also rename it, because the name it is given is just filled with numbers, making it difficult to find in the future.
18. To print out your new I.D. card, here's what I do. I make all four Homeschool I.D. cards for my four family members, saving them in a file that is easy to find on my computer. Next, I open up Microsoft Word and choose "Insert" and "Picture" to place the images into a new Word document. I could also do this using a graphics program like PrintMaster or PrintShop or other word processing programs. If the images don't like sitting nicely on your screen, you can right click on the image (on Microsoft Word) and select "Wrap Text - Square".
19. You'll want to size your ID card graphic so that it fits within the laminating pouches you purchase. For me, I need to have mine sized at 2.75 x 3.75 inches.
20. After all of the graphics are appropriately sized and spaced on your Word document (or word processing or graphic design document), place a piece of cardstock/index card thick paper into your printer. (Or, make a test run with regular printer paper first.)
21. Print out your page containing your new Homeschool I.D. cards. Cut them out and laminate them for your family's use! (See directions at the bottom of this screen on how to inexpensively laminate your own I.D. cards.)

 |
|
http://www.homeschoolbuyersco-op.org/homeschool-id/
If you click on the graphic or link above, it will take you to the Homeschool Buyers Co-op FREE HOMESCHOOL I.D. CARD page.
At their website, you can design your I.D. cards and then download them to your computer where you may print them out onto cardstock using your printer. At that point, you may either choose to have them laminated or leave them "as is." If you plan to laminate the cards yourself, select to have the cards emailed to you. The other option is to pay approximately $5-$6 per I.D. card for them to send you a laminated copy of the I.D. cards you have designed for your family.

How to inexpensively laminate your own Home School I.D. cards:
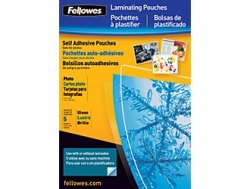
Fellowes® Self-Adhesive Business Card Laminating Pouches (Double-Sided) 5mil, 5 Pack
Item #572893; costs around $7.99 at Staples to laminate 5 cards.
Item #572893; costs around $7.99 at Staples to laminate 5 cards.
When looking for laminating pouches online or at office supply stores, you will want to look for the words, "self-adhesive" or "self-laminating," or "cold laminating" if you don't personally own a laminating machine. For the Fellowes brand, look for the laminating pouches that have snowflakes on the bottom right hand corner. Scotch, as well as other brands, also sells small self-sealing laminating pouches.
I choose to use the Business Card sized self-adhesive pouches, since I want them to be about the size of my driver license, the typical standard size for most cards carried in wallets. You may choose whichever card size you prefer. Just make certain that the measurements of your printed I.D. card are about 1/4" smaller all around than the outside measurements of your laminating pouches, or you may find that the pouches begin to peel apart over time.
I choose to use the Business Card sized self-adhesive pouches, since I want them to be about the size of my driver license, the typical standard size for most cards carried in wallets. You may choose whichever card size you prefer. Just make certain that the measurements of your printed I.D. card are about 1/4" smaller all around than the outside measurements of your laminating pouches, or you may find that the pouches begin to peel apart over time.

Michael's craft supply stores are now offering 15% off all purchases every day of the week for teachers...and they will include homeschooling families in this discount if you have some sort of Homeschool I.D. card or "proof" that you are educating your children at home.
This also makes sign-up for JoAnn Fabrics and Crafts painless. Instead of being grilled by the staff on proving to them that I'm a home educator, as has happened to me before, you can just show them the card and get signed up for their educator/homeschooling discount without a hassle.
This also makes sign-up for JoAnn Fabrics and Crafts painless. Instead of being grilled by the staff on proving to them that I'm a home educator, as has happened to me before, you can just show them the card and get signed up for their educator/homeschooling discount without a hassle.
How useful have you found homeschooling I.D. cards? For what have you used them the most?
